Italian Country Bread

Artisan bread—at last!

Crispy, chewy, full of big, airy holes. . . ah nirvana!  I’ve been baking bread since I was a child, yet I’ve never mastered the true “hole-y” artisan bread.  Lord knows I have bought every type of flour imaginable from King Arthur Flour, but still something was missing.  Found it!  Actually my dear friend R’s sister-in-law found it, but lucky me because it was passed on.

This bread will make your bread-making life complete—well, not complete maybe, but it will make you and everyone you share it with very, very happy!  The process beforehand is equivalent to making a biga, which is what helps with the flavor and holes.

Don’t be scared of the three-day process.   For a bread this amazing, it is ridiculously easy.  If you’re an experienced user of yeast, the texture of this bread is very different.  You will not get the satisfaction out of pretending it’s your former boss by bashing and kneading it to death, but you will get enormous satisfaction after you taste it.

It’s kind of slimy, but it’s supposed to be.  Your KitchenAid will be your best friend.  Use only the paddle, not the hook or whisk.  On the third day be very generous with the flour on your board or pastry cloth.  Drop, flip, cut, shape, and move it (gently) to your pan.  Slash it and proceed with the misting, etc.  You will not be disappointed.  You will be in awe.

Here’s the recipe exactly as it was given to me.  If you have any questions or concerns, email me and I can explain.  Please try it.  Pretty please.

Italian Country Bread

First day:  Mix ½  teaspoon yeast in 1 cup warm water in mixer bowl; when dissolved, add 1 cup flour (King Arthur White.)   Beat 50 times to mix.  Cover bowl with plastic for 12 to 24 hours.

Second day:  Dissolve 1 ¼ teaspoons yeast in 1 ½ cups warm water.  When dissolved, add to starter and mix.  Then add 2 cups flour to starter and mix 50 strokes.  Cover with plastic wrap  for 12 to 24 hours.

Third day:  Stir 1 ½  cups flour into starter with a wooden spoon 20 or 30 strokes.  Put mixing bowl in mixer, using the mixing blade (not the dough hook), turn on to lowest speed and mix 17 minutes.  Turn off mixer, letting dough – which will be VERY wet – slide into bowl while you get 1 Tablespoon salt.  Turn on mixer to lowest setting, sprinkle salt slowly into bowl and mix 3 minutes.   At this point you can leave dough in bowl to rise or transfer to an oiled large bowl.  Cover bowl with plastic and leave for 4 or 5 hours – should be tripled in size.

Preheat oven to 450 degrees, place rack in lowest position in oven.  Have a spray bottle of plain water ready.  Use parchment paper on large silver cookie sheet.  I fold the parchment paper in the middle of the sheet to form a barrier between the two loaves.

Turn the dough out on a heavily floured surface (I use a pastry cloth).  The dough will slowly fall out of the bowl in a wet heap.  Take one side of the circular heap of dough and pull it toward you until the dough is turned over and the floured side is up.  The dough will now have an oblong shape. Cut it down the center with a dough knife or large narrow-bladed knife, forming two narrow, long loaves.  Tuck the ends under to maintain a uniform rectangular shape  and transfer each loaf to the pan.  The dough will be very soft and shapeless making it hard to handle until you get used to it.  I put a hand on each end, push the dough toward the center and lift it quickly to the  sheet, spreading it to the shape I want. Score the loaves with a sharp knife, three cuts on each loaf.

Put the bread into the oven, spray the bread and oven with water, close door.  Spray every 3 minutes for 3 times.  Total cooking time is 38 minutes including spraying time.  The purpose of the spraying is to keep the crust soft at first so the bread can expand and form a lovely texture.

Now, let me say I have violated every one of these instructions in one way or another and I’ve never had a failure – this bread is incredibly forgiving.  I don’t say this as a challenge – I’m sure it can be screwed up – but so far any reasonable effort has been rewarded.

Oh, make sure your butter is at room temperature so when the bread comes out of the oven you can slather some on your first slice!  And, for more yeast love check out YeastSpotting!

Apricot Almond Bread

Loafing around.

You know the old joke about men looking forward to the Victoria’s Secrets catalog arriving in the mail?  I know how they feel because when my King Artur Flour Baker’s Catalogue arrives, I’m in nirvana.  Seriously.  Heaven.  I drool.

My holiday preview issue arrived yesterday and at 9:00 in the evening I was whipping up a batch of bread!  Granted, I tweaked their recipe quite a bit, but man, oh man, this morning the bread on my plate was well worth the late evening.  Made it, baked it, and let it sit on the counter until this morning.  No joking.  I did not cut into the bread after it left the oven because King Arthur said to allow it to cool completely, and we all know I listen to King Arthur.

According to King Arthur, the “bread is a cross between a typical baking p0wdered-leavened bread, and a yeast bread.”  Say what?  Never tried that trick before.  The beauty of it is it’s super easy to whip up, and you only let it rise once (one hour) and then it’s popped in the oven.  No punching down and waiting hours for two risings.

As I said, I changed their recipe of Easy Cinnamon Bread to Apricot Almond Bread and can’t wait to start experimenting with other variations.

If you’re not a good yeast bread baker, please try this.  Prior to baking it won’t resemble a yeast bread whatsoever (it’s sticky), so if you’re used to baking quick breads, you’ll find this recipe very familiar.

No more typing, more eating.  Bye now.

Apricot Almond Bread

3 cups King Arthur Unbleached All-Purpose Flour
½ cup sugar
2 teaspoons instant yeast
1 teaspoon cinnamon
1 teaspoon salt
1 teaspoon baking powder
1 tablespoon King Arthur cake enhancer (opt.)
1 cup warm milk
¼ cup melted butter
1 large egg
½ cup chopped apricots
½ cup chopped almonds

Topping: Mix ¼ cup sugar w/ 1 teaspoon cinnamon

In a large bowl, mix together the flour, sugar, yeast, cinnamon, salt, baking powder, and cake enhancer.

In a separate bowl, whisk together the milk, butter, and egg.

Combine the wet and dry ingredients, beating until smooth.

Stir in the apricots and almonds.  Spoon batter into a greased 8½″ x4 ½″ loaf pan.  Let covered batter rest in a warm spot for one hour.  Sprinkle with topping mixture.

Preheat oven to 350° and bake bread for 35-40 minutes, until done.  Remove bread from oven and let rest in pan for 5 minutes, and then transfer from the pan to a rack to cool completely.

Note: let bread cool completely before slicing.

For more yeast love, check out YeastSpotting!

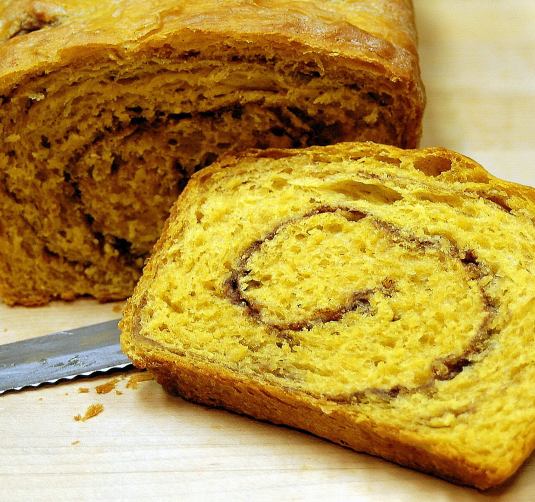
Pumpkin Cinnamon Swirl Yeast Bread

In my ongoing attempts to convince Mother Nature have Fall arrive in my neck of the woods two months early, I’m still cooking with pumpkin!  I just know that if my house smells fall-like, and I gain the requisite 10 pounds of winter weight, Fall will arrive sooner, rather than later.  With that in mind, and the fact that I had almost a cup of puréed pumpkin sitting in my fridge, here is my attempt at a yeast pumpkin bread.  Yes, I said yeast bread, not quick bread, yeast bread.  I found several pumpkin yeast breads floating around on the net, and of course, there are gazillions of cinnamon yeast bread recipes, but to combine the both?  I found zip and hence off I go to the lab kitchen, once again.  I really wanted to taste the pumpkin but not in an overly cloying way, and I wanted freshness, hence my use of fresh ginger.  Plus, I’m a fresh nutmeg type of gal, so I always grate fresh nutmeg.

I’m not going to lie to you (and lying is bad karma) and tell you the process isn’t slightly messy, what with the pumpkin and cinnamon being slung all over the place, because it is.  But oh, the results are so, so well worth it.  I kept tweaking the amounts of my flour until I got it right, so it may seem like a lot for one large loaf (9″ loaf pan), but you really need to balance the stickiness.  (FYI, I have only used King Arthur Flour for years;  I just love all their flours,  but if you can’t afford or find Kind Arthur Flour, just please use unbleached.)  Of course, if you’re a yeast bread baker, you know there is no such animal as precise measurements when it comes to flour.  It’s a trial and measure, dryness and humidity type of thing.  You’re also probably thinking I used a lot of cinnamon for the swirl; yes, I did.  If you’re going to the trouble to make cinnamon swirl you might as well go big, or go home, right?  Nothing is worse (well, in all honesty there are worse things…) than biting into a swirl of cinnamon and not really tasting the cinnamon.  Seriously, why even bother?

If you don’t think this bread is to-die for, I’ll be shocked.  I keep thinking I’m going to make french toast (divine!) out of it, but honestly it’s amazing enough just toasted with butter on it. The other bonus is this bread is really staying fresh because of the pumpkin.

Pumpkin Cinnamon Swirl Yeast Bread

¼ cup warm water
2-½ teaspoons active dry yeast
⅔ cup warm milk
1 egg, beaten
¾ cup puréed pumpkin
1 tablespoon oil
4-½ cups all-purpose flour (unbleached)
¼ cup brown sugar
1 teaspoon salt
¼ teaspoon ground cinnamon
¼ teaspoon ground or freshly grated ginger
¼ teaspoon ground nutmeg

Cinnamon filling:
1 teaspoon water
⅓ cup white sugar
1 tablespoon ground cinnamon

In electric mixer with bowl, dissolve yeast in water.  Add milk, egg, pumpkin, oil, 2 cups flour, brown sugar, salt, cinnamon, ginger and nutmeg to yeast mixture. With paddle attachment, mix for approximately one minute.

Switch to dough hook attachment.  Add remaining flour in ¼ cup intervals and knead, adding more flour if necessary, until you a smooth, only slightly sticky, elastic ball of dough.

Place dough in an oiled bowl, turning dough to coat.  Cover bowl with plastic wrap or towel and place in a warm area to rise.  After dough has doubled in size (approx. 1.5 hours), place dough on lightly floured surface and roll into a 9″ x 18″ rectangle.

Rub the water over your hands and then over surface of dough until top is barely damp.  Spread with cinnamon mixture.  Starting with short side, roll the dough into a tight cylinder and pinch seam to close.  Place seam side down in buttered bread pan.  Cover with towel or plastic wrap, and let rise in a warm area until almost doubled (approx. 1.5 hours).

Bake in a preheated 350°F oven approximately 45 minutes or until done.  If bread appears to be browning too much, tent with foil.  Remove bread from pan, brush top with melted butter, if desired, and cool on a wire rack.  Makes one simply lovely, delicious loaf.

For more delicious lovely yeast love, check out YeastSpotting‘s blog.